
Tuesday, March 22, 2011
Our Life in Pictures - Another Layout using My Simply Fun Templates!
We Were Made for Each Other!

Ingredients:
SBC+
Jennifer's Simply Fun Templates. (Hint: those attending my Simply Digital Design Class will receive a nice assortment of these)!
Cottage Garden Digital Kit CM
Family Life Kit CM
Variety of Textures and Materials (photos of barn doors and painted wood textures).
- Add the Template and leave as is or fill with a paper or material.
- Shadow and then re-shadow - several times - to create a burnished effect. This effect adds lots of depth as shown in this layout. Creating a "shadow box" effect - There are also some secrets used here which add to this effect. I plan to add this fun technique in an upcoming Tutorial. OR if you are attending this months class you will learn this fun secret!
- Insert photo boxes where needed along with embellishments, papers and titles all where desired in their designated spaces based on the template design. Once you have added these pieces and sized them to the template shapes - hide them behind the template. Or simply hide as you go.
- To create the heart effect used in the photo (top right). Use the "Swirly" Freebie. Add it to you page and then copy and paste another. Now go to the "Arrange Ribbon" and use the "rotate" tools. Select the option that flips your element horizontally. Now place the two pieces together creating a heart (you may need to trim away some of the excess with your cutters in the "Cut and Fill Ribbon" to create and complete the heart).
- Now, to create the effect that the heart is hiding behind the photo - you will need to zoom up on your layout in order to view just the photo (as large as you can). Now, go to the "Cut and Fill Ribbon" Select the Custom Cutter and choose the curved lines. slowly click around the area you wish to cut away. I chose to "copy" the part I cut and then this way you can drag the cut portion of the photo over the heart and still have all the parts of the photo to play with (does that make sense :0)
- I then used the "Text Wrap" tool found in the "Insert Ribbon" to add the text inside the heart! Once again use your zoom slider (found at the very bottom left of your screen) to see just exactly what you are doing. Hint: right click on your text at any time to edit the points and this will perfect your wrap. the closer in you are the easier it is to achieve a very nice smooth finish!
- The I Love You title is from Cottage Garden - some beautiful Word Art in that CM kit!


Miracles come when you least expect them!

Ingredients:
SBC+
Papers and Materials I created (enjoy receiving a WIDE variety of these fun Materials and Textures at my NEXT Simply Digital Design Class! :0)
Family Life Digital Kit from CM
Ashby Baby Kits from CM
Rusty Door Hinge Freebie
Vintage Note Paper Freebie
- Firstly, I added a "paper" I created. (A photo of an old vintage book cover). Stretched to make a 12x12 square.
- I then added a photo of a piece of cotton fabric, (right out of the dryer all crinkled and worn) on top and dropped the Opacity to soften it.
- I wanted the photo to blend right in, color and all. SO... firstly I added the photo, I then added a soft Glow Effect (Diffuse Glow Filter - found in the Format Ribbon).
- I then went up to the Cut and Fill Ribbon and selected the Straight Cutter option. I used the Blended edge (Note: you can stretch out the cutting lines to achieve a more blended effect). I blended all of the edges exposed on the layout (this in my opinion gives a more polished look than simply using the Soften Edge Filter, however, sometimes that is all you need).
- In addition I then went to the Color Ribbon and adjusted the Colors using the "Adjust Hue" option. I went to green, then softened it by dragging the saturation to the left and the intensity to the right.
- To complete the layout I added the "vintage note paper" freebie. the "Rusty Door Hinge" freebie and elements from Creative Memories New Ashby Baby Series and Family Life Embellishments.


Sweet Memories

Click here to learn more about Captured by Sabina! http://www.facebook.com/pa
Ingredients:
SBC+
My Own Paper, Masks and Vintage Overlays
Once again these are exclusive gifts given at my Simply Digital Design Classes. I may make them available to members on my site when my Tutorials are up and runnin'!
Joyful Word Art by Katie Pertiet
Be Mine and Lovable Digital Kits from CM
Doodles are my own
- First of all on this layout I began with a background of my own making! You can do it too! If you have ever been a Traditional Scrapbooker... let me take you back to your roots!
- Grab a piece of cardstock (any Color - but darker is better). Square is best and keep it around 8x8 so it will fit into your scanner! You are going to have some fun distressing it!
- Chalk it up, crumple it up, tear it... just go crazy... there are no mistakes here! I even let my six year old make a few with me! Use water to wet the edges and roll up the sides and corners etc...
- Now you are going to scan it in to your computer (I use Memory Manager) Super easy!
- Then you will bring it into SBC+ as a jpeg (photo). Add it to a blank page.
- Now you can use the handy dandy wand tool (and... yes I do watch Handy Manny with my son lol)! This tool is fund in the Cut and Fill Ribbon. Select the gray edges around your photo with the wand tool and erase them. You CAN clean it up a little, if need be, with the soften edge filter found in the Format Ribbon, afterwords.
- Now you can change up the colors etc... right in SBC+ Make it Sepia or B&W, change it to a much lighter color, change hues etc... all within the Color Ribbon.
- I then added some of my Photo Masks and "Vintage Photo Overlays" Once again these are exclusive gifts given at my Simply Digital Design Classes. I may make them available to members on my site when my Tutorials are up and runnin'!
- The Hearts and Overlays used on the Photos are from the Be Mine and Lovable Digital Kits from Creative Memories.
- The hand drawn hearts and doodles in the background can be created by hand with a "Bamboo Pen and Tablet". Another fun technique I will share at my Classes and Tutorials!
- Have Fun making some of your own Papers!
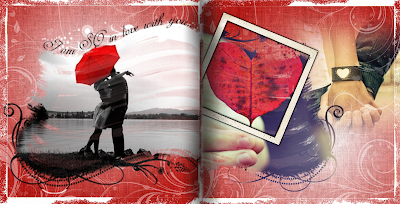
I am so in love with you!
This was a fun layout to create!
 Ingredients:
SBC+
Be Mine Digital Kit - CM (paper 4)
Photo Masks of my own design
(this was one of a set of exclusive masks I created for my Simply Digital Class attendees). Perhaps in the future I will make them available to members of my site - once I have my tutorials up :0)
Grunge Overlay and Frame - My own designs
- I began simply by adding a plain white rectangle stretched to the size of my layout and then filled it with a two tone gradient background of red and white.
- I used the gradient option at the very bottom of the selections second from the right. Make the "first color" red and the "second color" white.
- Once you have your background add the burlap surface found in the Format Ribbon.
- Now stretch your background so that the white center spills over the corner edge you desire. This is a simple yet effective look. (I used this exact effect on the "Just Be" layout of my son with orange and white-go and have a look to see another example). :0)
- I then added a white grungy edge (one that I created from an old photo). You can use any distressed overlay to achieve the same look.
- I added the Paper 4 from the Be Mine Digital Kit (then rubber stamped it in white).
- I then filled two of the same Photo Masks on either side with photos. (this was one of a set of exclusive masks I created for my Simply Digital Class attendees). Perhaps in the future I will make them available to members of my site - once I have my tutorials up :0)
- I used the text wrap feature in SBC+ to add the title.
- I then added the simple vintage frame and placed it on an angle for effect.
- The photo in the background was blended using the Soften Edge Filter in the Format Ribbon!
Wednesday, March 2, 2011


Blank "Grungy Block" Freebie - Add your own text or title!

- I added a freebie similar to this recently with the words precious in various fonts!
- Use this one to create your own!
- HAVE FUN!
Grungy Swirl "Freebie" Have Fun!

- Use this as part of a frame or a border along either the bottom or top!
- change the angle by locating your rotation tools in the "Arrange Ribbon"! Perfect and simple way to change it up!
Grungy Metal eyelet "Freebie"! Enjoy!!

- I used this embellishment on a recent layout I posted here titled "Just Be". Go have a look to see how you can use it too!
- Also try using your temperature options under the color ribbon - change up this brad from silver to gold add more blues/browns and create a completely different look!
- Have FUN!
Subscribe to:
Posts (Atom)


